By now you have updated your Facebook business page with a new cover photo, profile image and About Section. A business page is very important and it is public so you want to use it to sell, promote and engage. You should post frequently to engage visitors and pique their interest enough to hang around to see what you have to offer. Below are 3 ways to create engaging posts:
1. PINNING POSTS
This feature is used to anchor an important post to the top of your page so visitors see it first thing. This post stays anchored at the top for 7 days, but it’s a good idea to rotate your content more often than that to keep visitors engaged. After 7 days your post will automatically be unpinned. Only admins can pin a post. Visitors cannot.
To pin a post:
- Hover over the top right corner pencil icon
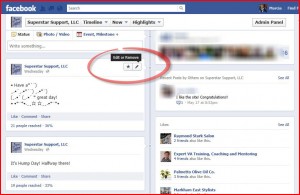
Pinning a post
- Select “Pin to Top” and the selected post will be pinned to the top of your page and will have an orange flag on the top right to indicate it is pinned.
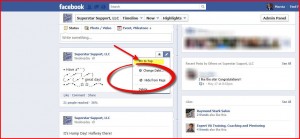
Pin posts to top
- The post can be unpinned any time by selecting “Unpin” under the pencil icon.
2. HIGHLIGHTING POSTS
Highlighting a post spotlights special promotions you might be running or brings attention to a sale you might be having or brings attention to a special announcement you might have. This post stands out and is easily visible as it expands across the width of your page, and it remains this way until it is no longer highlighted.
Only one main story can be pinned or highlighted at a time.
- To highlight a post:
- Hover over the top right corner and click the star.
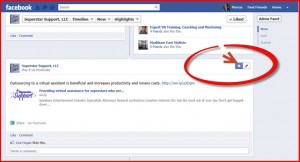
Highlight a post
- Your image will expand across the full width of your page.
- To undo this, hover over the top right corner and click the star.
3. SCHEDULING POSTS
Facebook recently released the ability to schedule posts right from Facebook itself, instead of using a third-party app. This is a convenient, time-saving feature. Status updates can be scheduled up to 6 months in advance and in 15-minute intervals.
- To schedule a post:
- Compose a status update like you normally do;
- Click the little blue clock icon in the lower left corner, select the year, month, day, hour, and minute when you’d like your status update to post on your timeline. Don’t worry about selecting a time zone, Facebook already knows your time zone. If you choose a date in the past, Facebook will immediately post on your timeline.
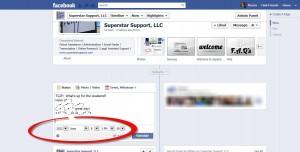
Schedule a post
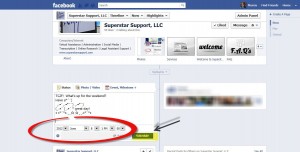
Click Schedule
Although posting is very easy, it is time-consuming. If you’d like more fan engagement on your page, it’s a good idea to post updates throughout the day. If you don’t have the time, I can help. One of the many services I offer as a virtual assistant is social media management. Please contact me to schedule a free 20-minute consultation.
3 WAYS TO CREATE ENGAGING POSTS ON FACEBOOK
By now you have updated your Facebook business page with a new cover photo, profile image and About Section. A business page is very important and it is public so you want to use it to sell, promote and engage. You should post frequently to engage visitors and pique their interest enough to hang around to see what you have to offer. Below are 3 ways to create engaging posts:
1. PINNING POSTS
This feature is used to anchor an important post to the top of your page so visitors see it first thing. This post stays anchored at the top for 7 days, but it’s a good idea to rotate your content more often than that to keep visitors engaged. After 7 days your post will automatically be unpinned. Only admins can pin a post. Visitors cannot.
To pin a post:
Pinning a post
Pin posts to top
2. HIGHLIGHTING POSTS
Highlighting a post spotlights special promotions you might be running or brings attention to a sale you might be having or brings attention to a special announcement you might have. This post stands out and is easily visible as it expands across the width of your page, and it remains this way until it is no longer highlighted.
Only one main story can be pinned or highlighted at a time.
Highlight a post
3. SCHEDULING POSTS
Facebook recently released the ability to schedule posts right from Facebook itself, instead of using a third-party app. This is a convenient, time-saving feature. Status updates can be scheduled up to 6 months in advance and in 15-minute intervals.
Schedule a post
Click Schedule
Although posting is very easy, it is time-consuming. If you’d like more fan engagement on your page, it’s a good idea to post updates throughout the day. If you don’t have the time, I can help. One of the many services I offer as a virtual assistant is social media management. Please contact me to schedule a free 20-minute consultation.